Tuesday, July 3, 2012

1968 -1971 Torino Fairlane Cyclone Bucket Seat Installation and Parts

The two door versions of these cars could be ordered with bucket seats.  To properly mount the bucket seats some additional parts were required.  There has an additional support of the inner, rear seat track bolts.  This U shaped bracket was tack welded in place.  The 1968-1969 cars used a special spacer under the front seat track bolts.  All cars used spacers under the rear seat track bolts.
During restoration, many find the U shaped bracket to be badly rusted.  The seat track spacers are sometimes missing.  Also, it is popular to install bucket seats in a bench seat car.  These parts are some of the most commonly requested parts.  To my knowledge, these parts are not in reproduction. 

When parting out cars, I have found the U shaped brackets in some 2 door, bench seat cars.  I find the welding on the support brackets to be poor.  If installing one of these brackets to concours conditions, it is advisable to have a welder with marginal skills install it. 


This is a support bracket in very good condition

This is one rear seat track spacer.  Two are required.
This is a front seat track spacer which is used 1968-1969 only
Seat support installed


Cracking around the mounting holes is common.

Tuesday, October 25, 2011

Ford Toploader Transmissions

Everyone knows the legendary performance of the Ford Toploader transmisson.  I have used these transmissions in my street cars as well as my stock cars.  During my stock cars days, I attributed at least four positions to our top loader transmission.  My driver could speed shift and gain at least 4 positions on each restart. 
I am in the process of restoring a 1969 Mustang Mach 1 with a 4 speed.  I called David Kee Toploader Transmissions for some parts to refresh my transmission.  They provided exactly what I needed at a very reasonable price.  Thier technical knowledge is beyond compare.  Check out thier website:
http://www.4speedtoploaders.com/

Sunday, August 21, 2011

1968 to 1971 Console Hump and Bucket Seat Support Installation

Parting out a 1968 Torino with an original console gave me a good opportunity to document the hump installation and bucket seat support bracket installation.

The cars with factory bucket seats had a special support installed for the inner, front seat stud for both seats.

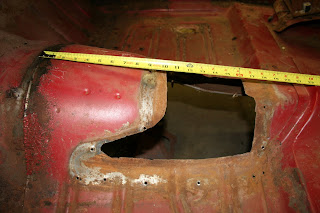
The shifter hump is installed over a rather rough cut hole in the transmission tunnel.  This hole is made with a cutting torch at the factory from what I can tell.  Over the years, I have seen a great deal of variability in the size of this hole.  I have seen a few that were cut larger than the hump and the holes were sealed with putty.  The one in the photos is one of the neatest ones I have seen.  I have also noted that the rear of the cut out is always dented.  (See the photos with me pointing to the dent)


Tuesday, August 2, 2011

Torino Parts are not all the same....

The Torino parts can be classified into three distinct groups: 68-69, 70-71 and the 72 and later cars.  There are few parts that interchange between the groups.  The 72 and later cars are totally different.  There are some parts that do interchange between the 68-69 and 70-71. 

How can you be assured that some advertised parts will fit your car?
I had the great fortune to work for an Apollo era engineer in the late 80s in the space shuttle program.  His mantra was " people lie, drawings lie but the hardware never lies"  I think this applies to parts compatibility.
I am in the process of parting out some 68-69 Torinos.  This gives me the opportunity to compare some of the 70-71 parts side by side to compare.  Not everyone has the opportunity but there are some people out there that have that experience.  There is a good group of loyal Torino owners that have owned dozens of these cars of various years.  These people are the true experts.

I use the Hollander interchange manuals extensively.  They are pretty accurate for the parts they list.  They do not list the small parts however.  Used Hollander manuals can be found on eBay at a reasonable price.  Better yet, befriend someone that has a set.
The Ford Master parts manual is another good source for small parts.  These manuals are over 1000 pages and require some time investment to understand.  I have found the information from these manuals to be reasonably accurate.  You can buy these manuals on CD for about $30 on eBay.
I am cautious about information on parts interchange on the various forums on these cars.  I usually try to validate this information with one of the above sources. 
Suggestions
1.  Before buying a used part from a vendor ask them what car the part was removed from and if they removed it themselves. 
2.  If it is a large part, ask for the Hollander parts interchange information
3.  Ask for a guarantee that the part will fit

Friday, July 1, 2011

Dis-sassembly Tips

Over time, I have dismantled a lot of cars.  Here are some general tips and some specific to the Torinos and Cyclone.

One of the most useful tools is a painters putty knife.  It has a thick blade and is great for removing trim inside or outside of the car.

I deal with rusty fasteners in stages.  I use an air ratcher and avoid impact wrenches.  If the bolts move but are very tight, I apply some penetrant.  For those that won't move, I apply some heat to the nut with a propane torch.  If that fails, I cut the bolt with a cut off wheel if I can.  Finally, if all else fails, I use a cutting torch.

Bumpers
Just about every bumper gives up a pretty good fight.  The outer bolts on the front bumper usually break the captive nut on the backside.  I usually use a big screwdriver to keep the broken captive nut from turning and use a ratchet to remove the bold   I always heat the nuts on the rear bumper brackets (the ones welded to the bracket).  Without some heat, the nuts usually twist off.

Exterior Emblems, Badges
If the nuts are corroded, the pin will break off when you attempt to remove the nut.  I will use a cut off wheel to split the nut so that it falls off.  I do this on all the fender badges.

Stainless Trim on Hood at Windshield
This is tricky to remove without bending the trim.  I have ruined a few.  Where it is crmped on the hood, soak with penetrant for a few days.  Put a wood block on the edge of the trim (on the top side of the hood) and use a hammer to gently work the trim off.  Work it from one end to the other until it comes off.

Hash Marks (70-71 Fastback)
These are held on with small nuts.  If you are completely stripping your car, these can be easily removed after the window regulator is out.  If you are not stripping the car, you can get to the nuts be removing the vent in the door jamb.  Use a small ratchet with a deep well socket.

Back Window (70-71 Fastback)
This curved window is glued in place.  The adhesive must be cut before the glass will come out.    I use some 1/16 inch cable to cut adhesive.  Use a small knife to cut a hole in the adhesive to allow you to thread the cable through.  If you have a helper, have them get inside the car.  Both of you call pull the cable around the perimeter of the glass to cut the adhesive.  You will need to go completely around the edge of the glass.  Most home improvement stores have this cable.  The same technique applies to the windshield.

Saturday, May 7, 2011

What the Hell Kind of Car is that?

In the mid 90's, I was a stock car owner of a hobby stock car with a hot foot driver.  At the time, we were racing on a quarter mile dirt track and consistently finishing in the top five every week.  I was hanging on the pit wall with my team watching our car move to the front when someone asks "What the hell kind of car is that?  Most of the cars were Camaros, so our car stuck out.  I answered the question, "Its a Ford Granada".  That was a lie.  It was actually a Mercury Monarch but who would admit to having a stock car named after a "butterfly".
I am a life long Ford lover and would like to say our key to success was the Ford hardware.  This was not altogether true.  Our secret weapon was our driver Jim "Troop" Blevins.  A second generation Ford stock car driver, he drove with reckless abandon. He was a joy to watch.  On restarts, he would normally pass three to four cars. 
My powerplant selection was the 351 Cleveland.  Once we worked through some reliability issues with the valve train, this engine was unstoppable.  On a dry dirt track, we had to severely de-tune the engine.  On a local half mile paved track, Troop could break the tires loose coming out of the corners.
The Granada was built on the same unibody as the 67-70 Mustang.  As a stock car, the stock suspension was awful.  It have poor roll steer and camber characteristics.   We solved these problems by taking some liberties with suspension mounting points and arm lengths. 

Saturday, April 23, 2011

1970 Torino GT Hood Black


While parting our a very original 1970 Torino GT, I took some photos of the underside of the hood that shows the black section.  Most hoods that I get have been repainted or swapped, so this feature is not visible.